An office closet can either be a black hole of tangled cables and forgotten supplies or a productivity powerhouse that keeps everything within arm’s reach. The difference comes down to thoughtful organization. Whether you’re working from a dedicated home office or carving out workspace in a spare bedroom, a well-organized closet eliminates the daily hunt for staplers, printer paper, and that one specific charger you need right now. This guide walks through practical strategies to assess, plan, and execute an office closet organization system that actually works, no Pinterest-perfect fantasies, just functional storage that fits your workflow.
Table of Contents
ToggleKey Takeaways
- An organized office closet eliminates time wasted searching for supplies and reduces cognitive load, directly boosting productivity and focus throughout your workday.
- Properly assess your space by measuring dimensions, categorizing inventory by usage frequency, and sketching a layout before implementing an office closet organization system.
- Install adjustable shelving systems and use clear bins with labels to create flexible, visible storage that adapts as your business and storage needs evolve.
- Zone items strategically by placing daily-use supplies at eye level, archived materials on top shelves, and heavy items on lower shelves to maximize efficiency and safety.
- Simple additions like cable management systems, LED lighting, and pegboard walls transform a basic closet into a highly functional workspace without expensive renovations.
- Prioritize functionality over aesthetics when organizing your office closet—build a system that matches your actual workflow rather than pursuing a Pinterest-perfect appearance.
Why Office Closet Organization Matters for Productivity
A cluttered closet costs time. Studies show the average person spends 2.5 days per year searching for misplaced items, and office supplies top the list. When files, equipment, and materials lack designated spots, decision fatigue sets in before the workday even begins.
Organized storage directly impacts focus. Visual clutter competes for mental bandwidth, making it harder to concentrate on tasks that matter. A closet with clear zones for active projects, archived files, and everyday supplies reduces cognitive load and keeps interruptions to a minimum.
There’s also a safety component. Office closets often house heavy equipment, stacked boxes, and electronics with trailing cords. Poor organization creates trip hazards and increases the risk of items toppling during retrieval. Proper shelving, weight distribution, and cable management aren’t just tidy, they’re practical safeguards.
Finally, an efficient closet maximizes space you’re already paying for. Instead of letting square footage gather dust, strategic organization turns vertical space, door backs, and awkward corners into usable storage that scales with your needs.
Assessing Your Office Closet Space and Storage Needs
Start by emptying the closet completely. This isn’t optional, half-empty assessments lead to half-baked solutions. Pull everything out, wipe down surfaces, and check for moisture issues, loose shelf brackets, or damaged drywall that needs repair before you install new systems.
Measure the interior dimensions carefully. Record height, width, and depth in inches, noting any obstructions like air vents, electrical outlets, or angled ceilings. Standard closet depth runs 24 inches, but older homes might offer less. These measurements determine which shelving systems will fit without custom cuts.
Categorize your inventory honestly. Group items by frequency of use: daily (printer paper, pens, current files), weekly (reference books, backup supplies), and seasonal or archival (tax records, old manuals). Items touched less than twice a year don’t belong in prime real estate, they can go on top shelves or in labeled bins.
Consider future needs. If your business involves growing inventory, client files, or equipment upgrades, build in 20–30% buffer capacity. Adjustable shelving systems offer more flexibility than fixed installations, especially if your storage needs shift over time.
Sketch a rough layout. It doesn’t need to be architectural-grade, a simple top-down view showing shelf placement, floor space for larger items, and door-mounted storage helps visualize the plan before you start drilling.
Essential Storage Solutions for Office Closets
Shelving Systems and Adjustable Options
Wire shelving is the workhorse of closet organization. Ventilated wire racks prevent dust buildup and cost $1–3 per linear foot for basic configurations. They’re easy to install with basic anchors and a level, though you’ll want to hit at least one stud for shelves holding more than 20 pounds.
Laminate or melamine shelving offers a cleaner look and better support for heavy binders and equipment. Expect to pay $3–6 per linear foot, and note that particleboard shelves longer than 36 inches may sag under weight without center supports. For closets storing reference libraries or large-format printers, ¾-inch plywood cut to size provides the best load-bearing capacity.
Adjustable track systems (like standards and brackets) are worth the upfront investment. They use vertical metal tracks mounted to wall studs, with movable brackets that reposition in 1-inch increments. This flexibility matters when storage needs change, you’re not locked into fixed shelf heights. Installation requires a drill, level, and stud finder: plan for 30–45 minutes per 6-foot track.
For tight spaces or awkward corners, corner shelving units maximize every inch. Rotating lazy Susans work well for small supplies like sticky notes and batteries, keeping everything accessible without deep digging.
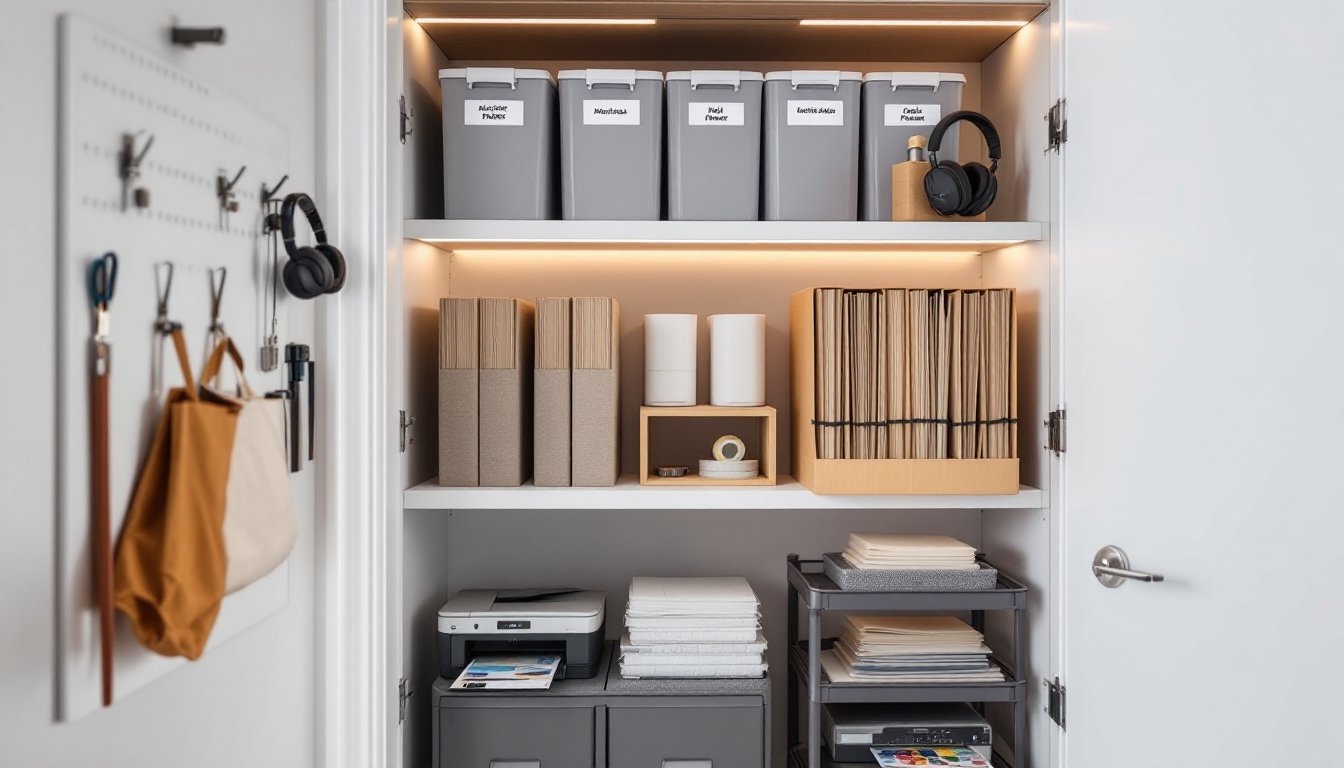
Bins, Baskets, and Drawer Organizers
Clear plastic bins beat opaque containers every time. Being able to see contents at a glance eliminates guesswork and reduces the chances of buying duplicate supplies. Look for bins with reinforced handles and snap-lock lids if you’re stacking them more than three high.
Fabric bins and baskets work for lightweight items like cables, notebooks, and mail, but they’re not suitable for anything heavy or prone to moisture damage. They collapse when empty, which makes them handy for small space living solutions where storage needs fluctuate.
Drawer organizers bring order to shallow shelves or pull-out systems. Modular dividers let you customize compartments for pens, paper clips, USB drives, and other small items that otherwise migrate into junk territory. Spring-loaded dividers adjust to drawer width without tools.
Label everything. A label maker is a $20–40 investment that pays for itself the first time someone else needs to find something in your closet. Use large, high-contrast text and include contents plus date for archived boxes.
Step-by-Step Guide to Organizing Your Office Closet
1. Clean and prep the space. Vacuum corners, wipe shelves with a damp cloth, and let everything dry. If you’re painting or patching walls, do it now. Use a mold-resistant primer in closets with humidity issues.
2. Install shelving from top to bottom. Start with the highest shelf and work down. This prevents you from leaning over installed lower shelves and makes leveling easier. Use a 4-foot level and mark stud locations with painter’s tape before drilling. Wear safety goggles and a dust mask when cutting or drilling.
3. Zone by category and frequency. Assign specific shelves or sections to related items. Keep daily-use supplies at waist to eye level (the “strike zone”). Place archived files and seasonal items on top shelves. Heavy or bulky items go on lower shelves or the floor to prevent tipping.
4. Use vertical space aggressively. Stack bins vertically rather than spreading them horizontally. Mount hooks on the inside of the door for bags, headphones, or lightweight tools. Pegboard panels installed on side walls hold scissors, tape dispensers, and other frequently grabbed items, no drawer required.
5. Carry out a cable management system. Velcro cable ties, clips, or a mounted power strip with built-in cable routing prevent the cord tangle that kills efficiency. For equipment with multiple cables, take practical organizing tips to heart and label each cable at both ends with a tag or color-coded tape.
6. Add lighting if needed. Many closets lack overhead fixtures. Battery-powered LED puck lights or motion-activated strips mounted under shelves make a huge difference. No electrical work required, just peel-and-stick installation.
7. Test the system. Put everything back according to your plan. Live with it for a week, then adjust. If you’re constantly reaching past one item to grab another, swap their positions. The best organization adapts to actual use, not theoretical logic.
Creative DIY Office Closet Projects
Custom file dividers transform standard shelves into vertical filing systems. Cut ¾-inch plywood into strips matching your shelf depth, then install them perpendicular to the shelf at 3-inch intervals using wood glue and small finish nails. This creates slots that hold manila folders, project binders, or oversized envelopes upright.
Rolling cart stations turn floor space into mobile storage. A basic three-tier utility cart (available for $30–60) holds a printer, paper, and ink cartridges in one unit that pulls out when needed and tucks away when not. It’s especially useful if your office closet doubles as general household storage.
Pegboard tool walls bring workshop-style organization to office closets. Mount a ¼-inch pegboard panel to 1×2 furring strips (this creates the gap needed for hooks) and secure the strips to wall studs with 3-inch wood screws. Arrange hooks for scissors, hole punches, staplers, and tape, everything visible and within one-handed reach.
For those converting a closet into workspace, consider adding a fold-down desk. A 24 x 18-inch wall-mounted drop-leaf table secured with heavy-duty hinges provides a temporary work surface that disappears when not in use. Ensure it’s anchored into studs and rated for at least 50 pounds if you’ll be resting a laptop or monitor on it.
Drawer inserts from scrap wood organize shallow spaces without buying kits. Measure interior drawer dimensions, then cut ½-inch plywood into strips that interlock in a grid pattern. A miter saw gives the cleanest cuts, though a circular saw with a guide works fine. Sand edges smooth and apply a quick coat of polyurethane if you want a finished look.
Always prioritize function over aesthetics in utility spaces. A closet system that looks magazine-ready but doesn’t match your workflow will fail within a month. Build what you’ll actually use, even if it’s not Instagram material.